Azure MFA NPS Extensions with NetScaler nFactor Authentication

Configuring a seamless MFA experience with nFactor and the Azure MFA Extensions
- Intro
- Setting up Azure MFA, NPS roles and extensions
- Setting up Load Balancing for the NPS Servers
- Configuring NetScaler nFactor Authentication
- Create Authentication Virtual Server
- Add an LDAP and RADIUS Authentication Server Profile
- Add LDAP and RADIUS Authentication Policies
- Create an Authentication Login Schema Profile and Policy
- Create a Policy Label
- Assign Authentication Policy to the Authentication vServer
- Assign a Login Schema to the Authentication vServer
- Configuring the NetScaler Gateway vServer
- End Result
- Conclusion
Intro
Azure MFA (Multi Factor Authentication) is fast becoming a topic being discussed with pretty much all my customers, even those that have an existing MFA solution in place, but are realising they may already be entitled to the offering from Microsoft as part of their +Security bundles within the Office 365 space.
The addition of the Azure NPS extensions into the product set simplifies the implementation and discussions yet again, as we can now leverage existing servers to provide the RADIUS endpoints for services such as NetScaler to authenticate against.
In this post, I am going to configure NetScaler nFactor Authentication to simplify the on-boarding of Azure MFA Authentication via the NPS Extensions with load balanced RADIUS Servers. My setup for this guide consists of the following components:
- 2 x NPS Servers with the Azure MFA Extensions
- 2 x NetScaler VPX Appliances with Enterprise Licencing
- 1 x AAA vServer
- 1 x RADIUS LB vServer
- 1 x Access Gateway vServer (Unified Gateway)
Setting up Azure MFA, NPS roles and extensions
Firstly, Christiaan Brinkhoff has a fantastic article here which I base my initial configurations on. I am not going to reinvent the wheel; his work is always exceptional so that’s the starting point for NPS.
I suggest starting with his article as the only point of change here, is once we get to the NetScaler configurations with a few exceptions noted below:
- My configuration includes multiple NPS Servers for redundancy
- Because I am load balancing the NPS servers via NetScaler, the NPS Servers need to include the relevant NetScaler SNIP as a RADIUS Client. I include the NSIP of each NetScaler, and the SNIP
This configuration is based on a NetScaler Enterprise Licence, if you do not have Enterprise you will need to configure traditional Authentication Policies.
Update 24.04.22 - Additional Logic and Code by Wee Sern Soo. The code block allows for group based decisions to selectively control MFA requirements at the ADC level. The block is at the end of this article
Setting up Load Balancing for the NPS Servers
Once you have configured both NPS Servers, it’s time to setup RADIUS load balancing on the NetScaler front.
Once again, there is already a documented step by step guide by Carl Stalhood (Surprise!) here for RADIUS load balancing. Follow this to get you started and pay attention to the load balancing Method mentioned.
Note that if you are using an earlier version of NetScaler than 12, Carl has guides available as well
Configuring NetScaler nFactor Authentication
Why nFactor for this type of deployment? Primarily believe it or not, it’s due to its simplicity when integrating with multiple client types, the lack of requirement for rewrites on the authentication pages, and the support of whatever theme you want.
As per Citrix Documentation on nFactor:
nFactor authentication enables a whole new set of possibilities with respect to authentication. Administrators using nFactor enjoy authentication, authorization, and auditing (AAA) flexibility when configuring authentication factors for virtual servers
Traditionally, Citrix clients (including Browsers and Receivers) use the active directory (AD) password as the first password field. The second password is usually reserved for the One-Time-Password (OTP). However, in order to secure AD servers, OTP is required to be validated first. nFactor can do this without requiring client modifications.
Create Authentication Virtual Server
Go to Security -> AAA – Application Traffic -> Virtual Servers.
Create a non-addressable Authentication vServer.
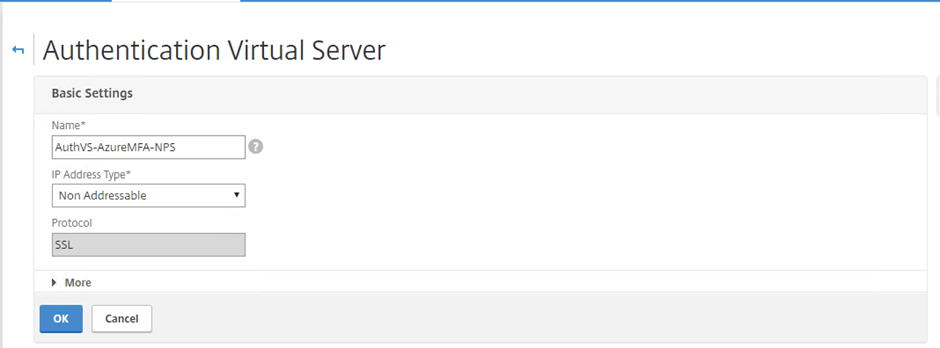
Non-addressable Authentication Virtual Server
Bind your Certificate as normal. Skip through the other settings for now
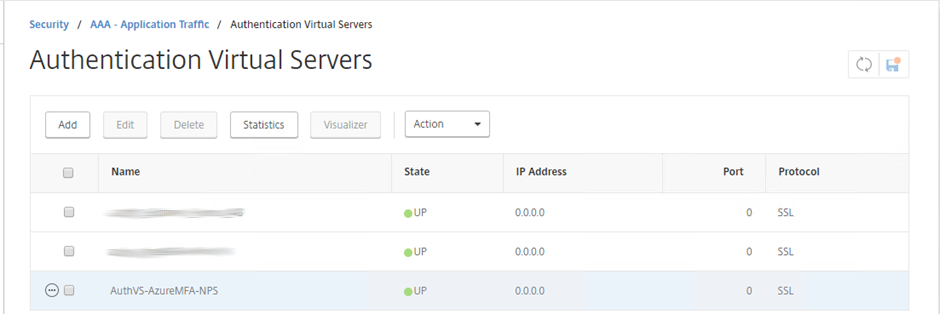
Authentication vServer created and in an Up state
Add an LDAP and RADIUS Authentication Server Profile
Go to Security -> AAA – Application Traffic -> Policies -> Authentication -> Basic Policies -> LDAP
Select Servers and create an LDAP Server if you don’t have one
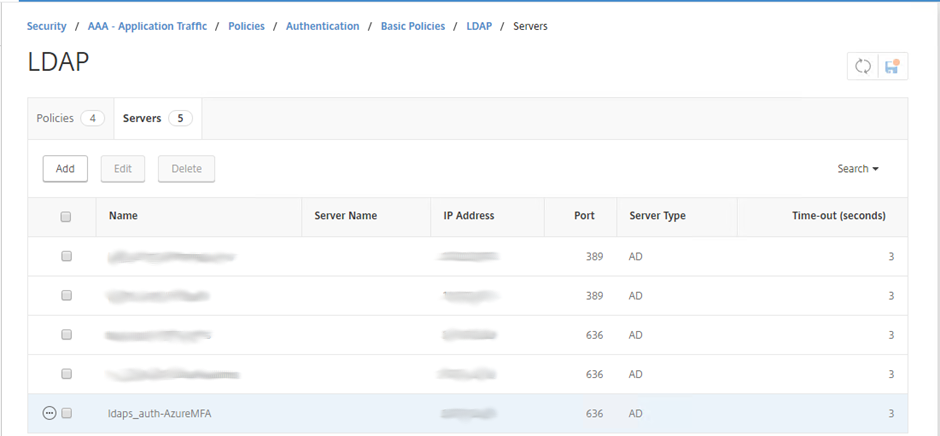
LDAP(S) Authentication Server
Go to Security -> AAA – Application Traffic -> Policies -> Authentication -> Basic Policies -> RADIUS
Select Servers and create a RADIUS Server if you don’t have one (I use the NetScaler VIP created as my RADIUS LB) Ensure that your RADIUS profile has the appropriate timeouts, NAS ID and password encoding set
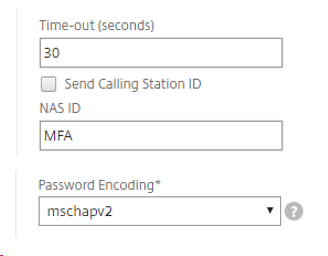
RADIUS Server - Note Time-Out, NAS ID and Password Encoding Type
Once completed, confirm your Server object exists
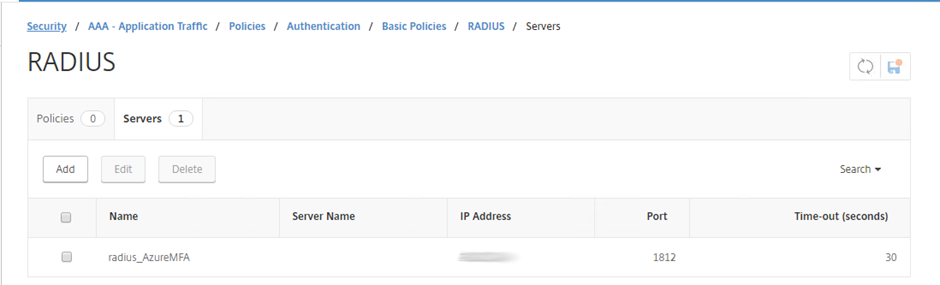
RADIUS Authentication Server
Add LDAP and RADIUS Authentication Policies
Go to Security -> AAA – Application Traffic -> Policies -> Authentication -> Advanced Policies -> Authentication Policies.
Add two policies: one for LDAP and one for RADIUS. set the Request Server to the Authentication Servers you created previously, and set the expression to true
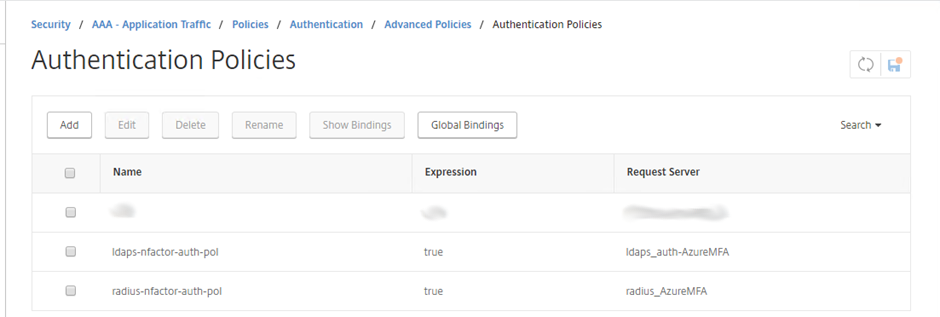
Advanced Authentication Policies - LDAP and RADIUS
Create an Authentication Login Schema Profile and Policy
Go to Security -> AAA – Application Traffic -> Login Schema
Select the Profiles tab and Click the Add button
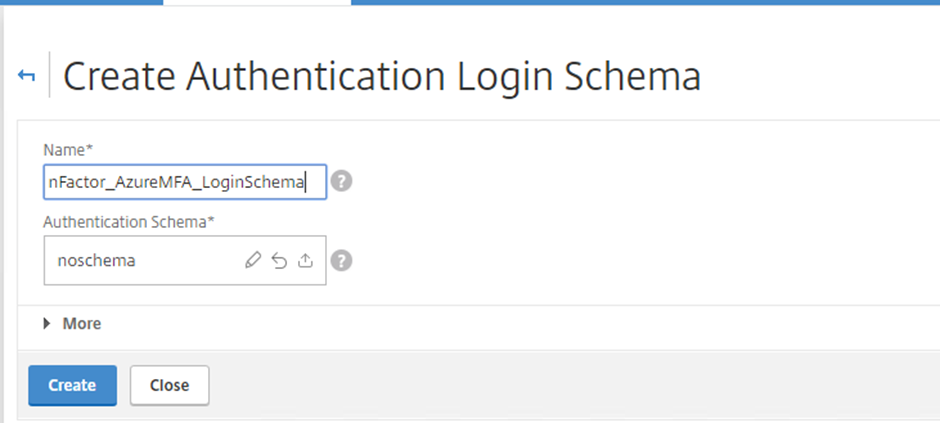
New Authentication Login Schema
Select the pencil next to the noschema default entry under Authentication Schema: Choose the SingleAuth.xml entry as your starting template. Select Edit on the right hand side
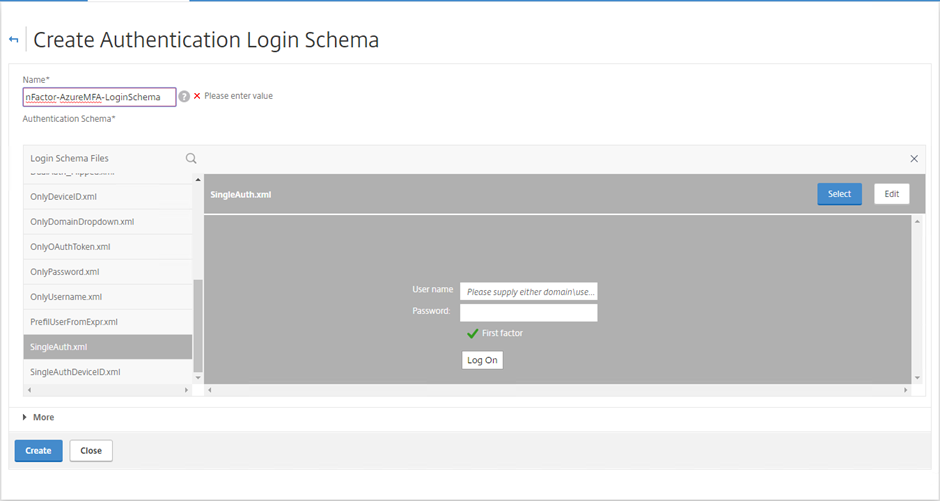
SingleAuth.xml Schema Template
Give the Schema Profile a name and edit any fields you want to alter

Custom Schema Profile Fields
Select Save Ensure that you select your new template and then select create. Do this by pressing select on the right hand side
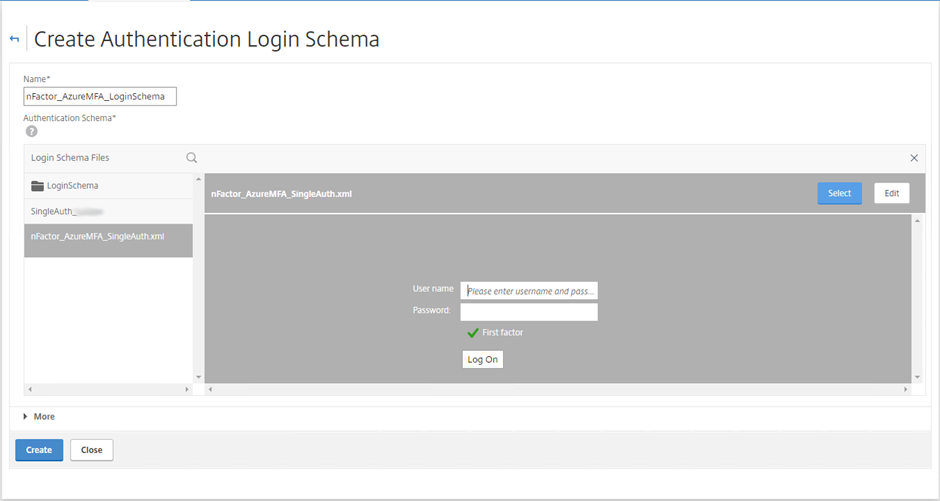
Ensure you select the new Schema
Confirm the login Schema Profile is created
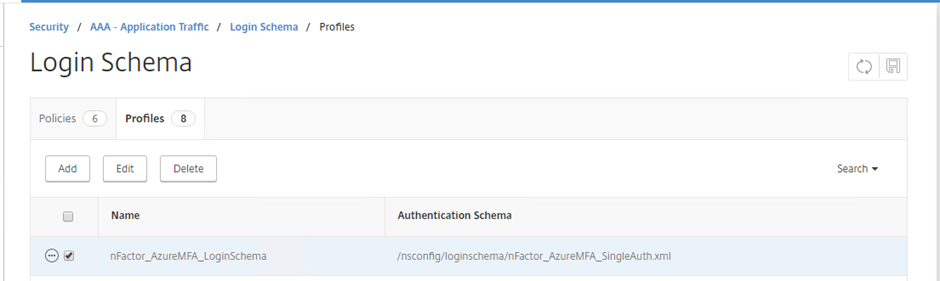
Login Schema Profile created
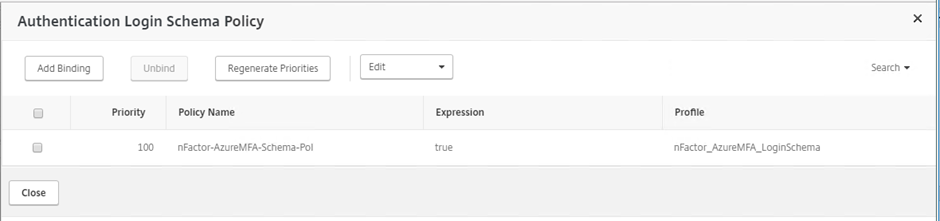
Select the Policies tab and Click the Add button Give the Policy a name and select the Profile you just created. Give the rule a value of true.
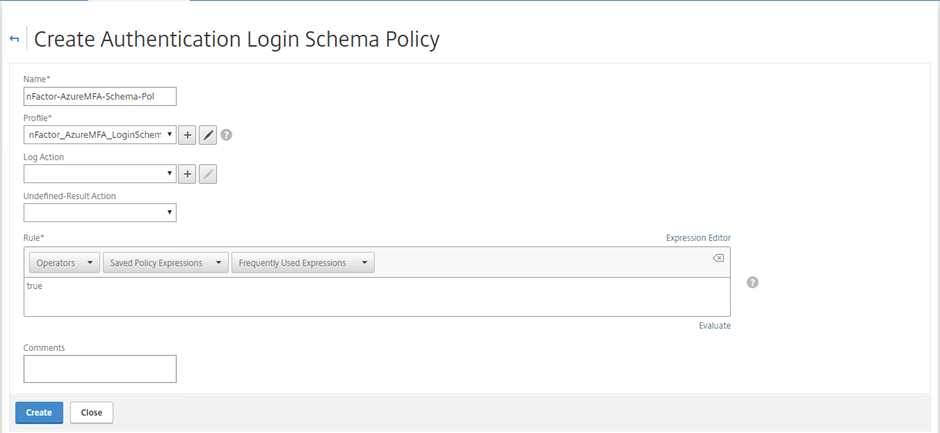
New Login Schema Policy
Select Create Confirm the new policy is created
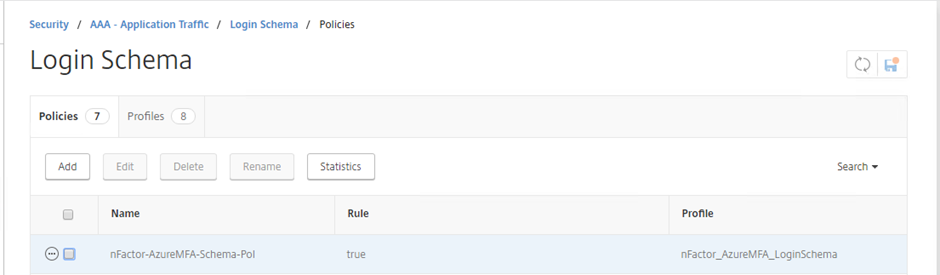
Login Schema Policy created
Create a Policy Label
A policy label specifies the authentication policies for a particular factor. Each policy label corresponds to a single factor. The policy label must be bound as the next factor of an authentication policy or of another authentication policy label. Typically, a policy label includes authentication policies for a specific authentication mechanism
Go to Security -> AAA – Application Traffic -> Policies -> Authentication -> Advanced Policies -> Policy Label
Select Add.Give the PolicyLabel a name
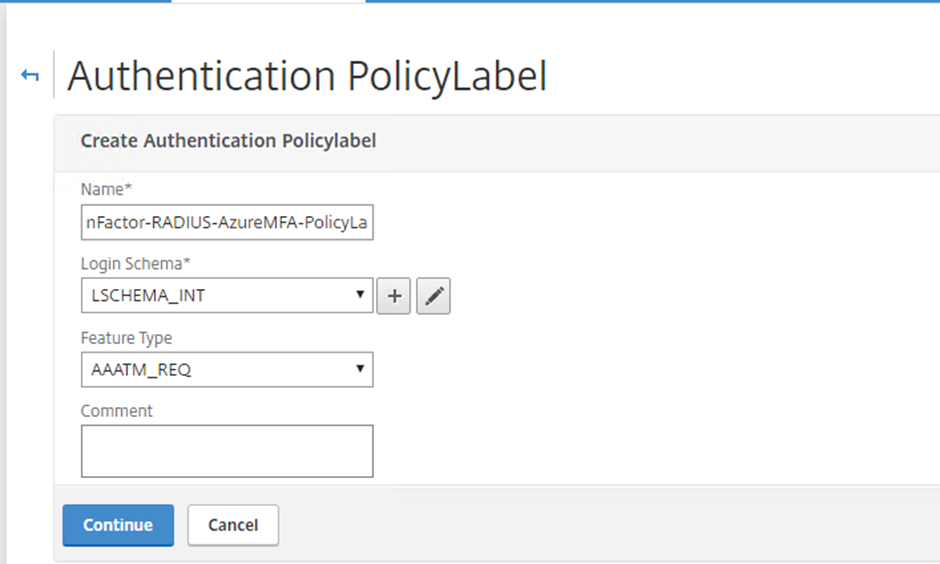
New Authentication PolicyLabel for RADIUS Authentication
Select Continue. Select the RADIUS Authentication Policy you created above. Note this is a very simple use of nFactor, we are only using a single Policylabel with RADIUS as our second factor
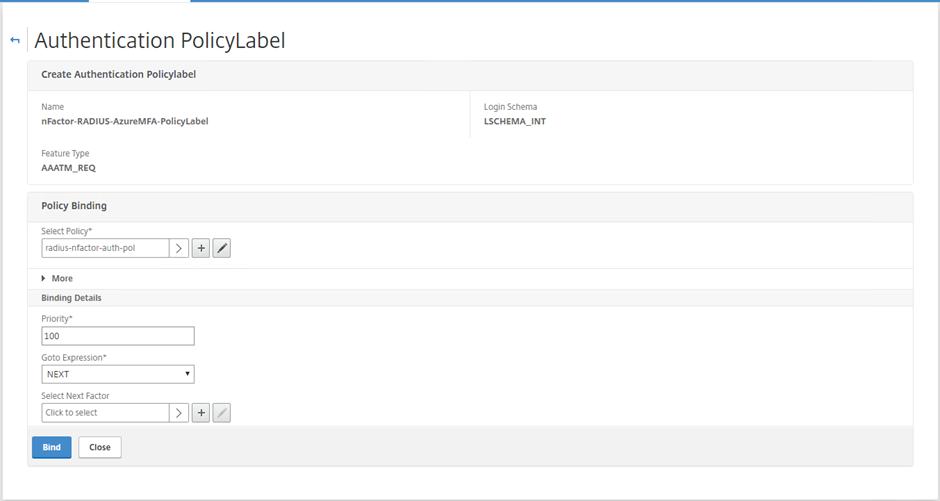
Bind the RADIUS Authentication Policy to the PolicyLabel
Select Bind
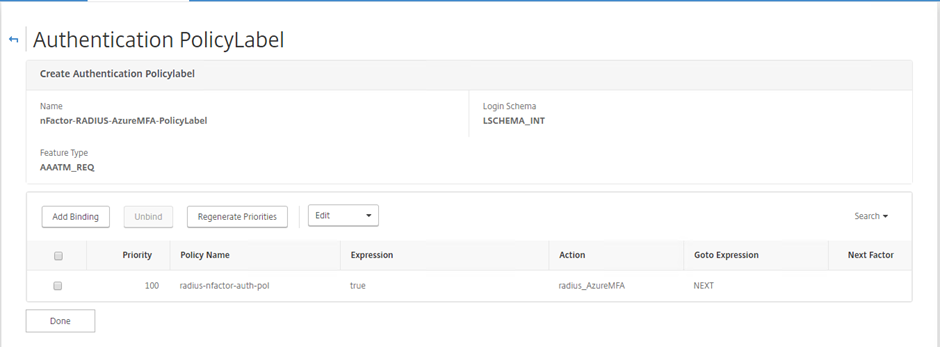
Confirm PolicyLabel is created with RADIUS Authentication Policy
Assign Authentication Policy to the Authentication vServer
Go to Security -> AAA – Application Traffic -> Virtual Servers
Edit the Authentication vServer you created earlier and select “Advanced Authentication Policies”
Advanced Authentication Policies for the Authentication vServer
Select the LDAP Policy that you created previously and then select your RADIUS Policy Label as the next Factor
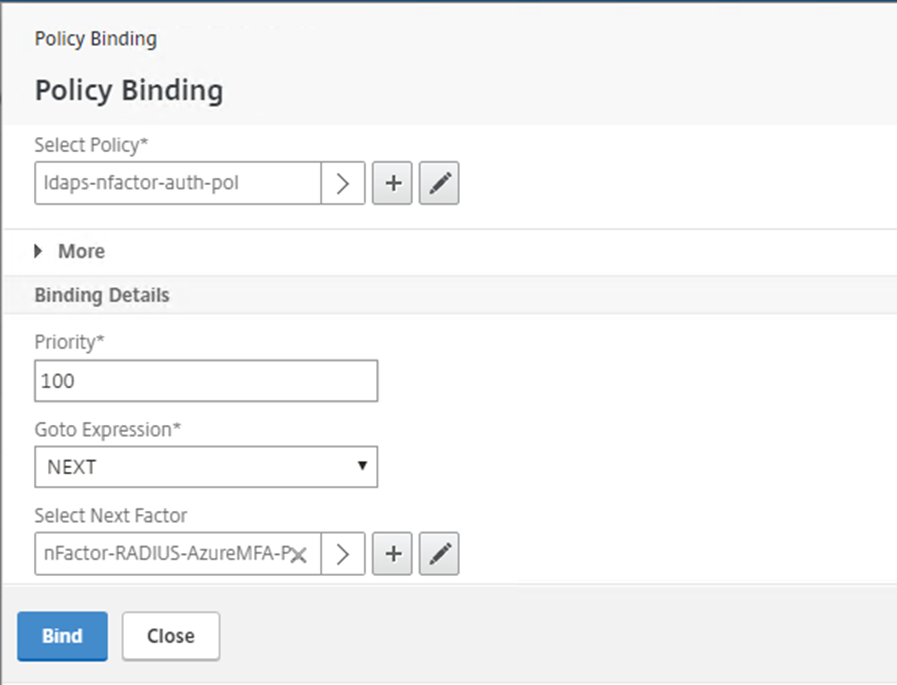
LDAPS is our first Factor, RADIUS PolicyLabel as our Second
Select Bind
Assign a Login Schema to the Authentication vServer
Go to Security -> AAA – Application Traffic -> Virtual Servers
Edit the Authentication vServer you created earlier and select “Login Schema” Bind the Login Schema Policy you created previously
Bind the Login Schema created previously
Configuring the NetScaler Gateway vServer
At this point, you would remove existing Authentication Policies assigned to your Gateway vServer, and bind your new Authentication Profile.
Go to NetScaler Gateway -> Virtual Servers -> Edit your Gateway -> Select Authentication Profile.

Current Authentication Profile
Select the + to Add Give the Authentication Profile a name, and select the Authentication vServer you created earlier
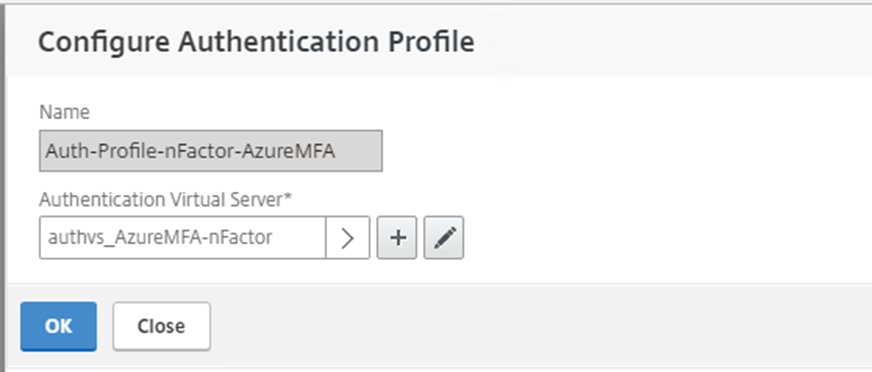
Create Authentication Profile
Select OK and confirm your Authentication Profile is applied

Authentication Profile Assigned to Gateway
Note that this creates the profile below, but doesn’t need all the other mandatory fields that creating it manually requires
Security -> AAA – Application Traffic -> Authentication Profile
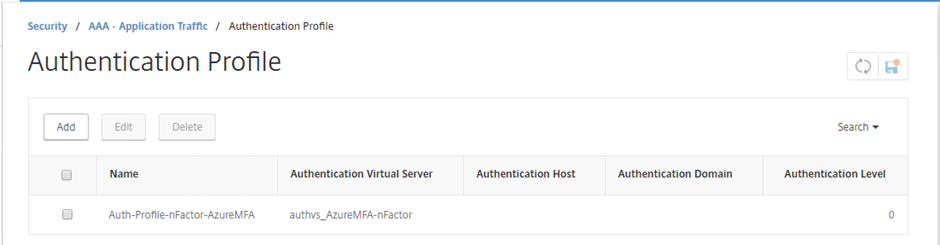
Authentication Profile Created via Gateway
End Result
Once everything has been applied, you should experience a simple logon scheme on your Gateway vServer as below:
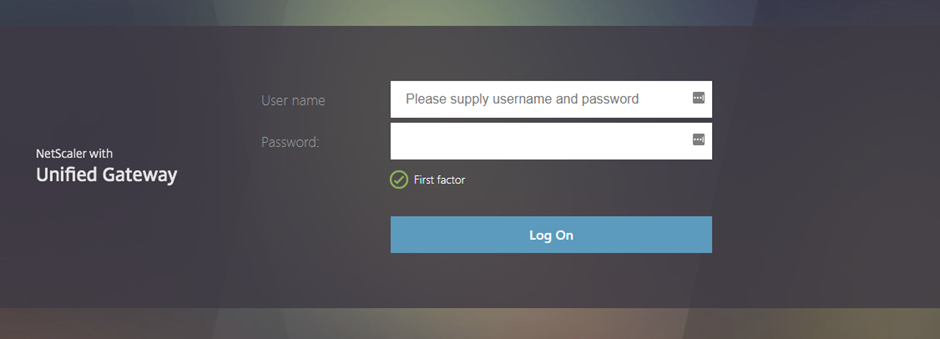
RFWebUI Web Page - First Factor
Once you have entered your first Factor (LDAPS Username and Password), the nFactor configuration will move to RADIUS, the behaviour of the next stage will differ depending on your Authentication Mechanism within MFA.
If you use the Authenticator App, you will be prompted for confirmation on your mobile device. The NetScaler will wait 30 seconds for this confirmation to take place before timing out.
If you use Text Message/SMS based authentication, the NetScaler will prompt you for your confirmation PIN as follows:
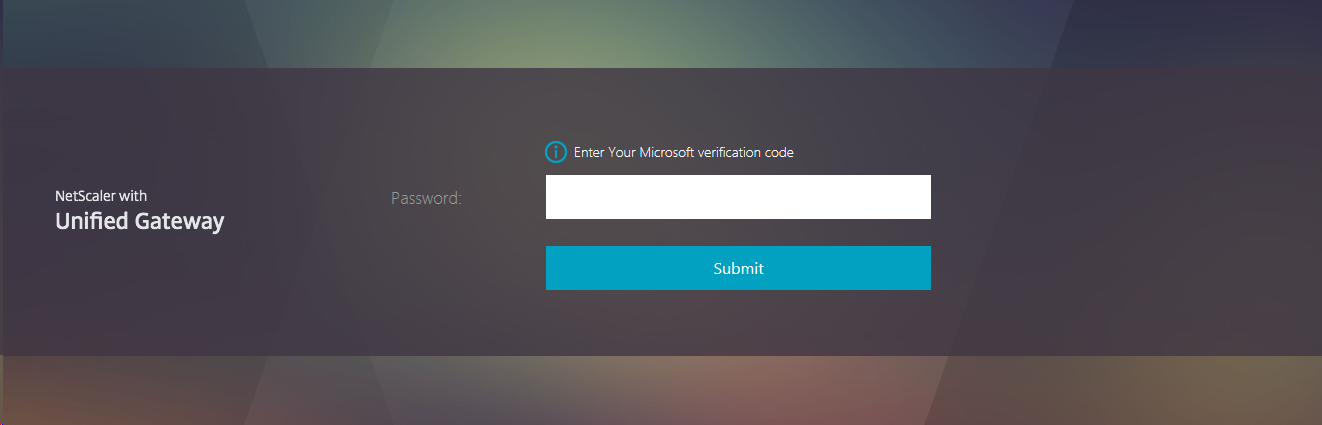
RFWebUI Page Page - Second Factor - SMS/Text
This behaviour will follow across Web, Receiver, Mobile Receiver and the SSL VPN Client
Conclusion
As with everything NetScaler, there are many ways to achieve the same result. This is only a basic use of the nFactor capability on NetScaler and there probably more advanced or different ways of configuring the above, however it seems to fit well together with NPS and Azure MFA across multiple device types.
Update 24.04.22 - Additional Logic and Code by Wee Sern Soo
The below nFactor flow command blocks re-create the above, modified to contain a decision block between the secure LDAP and RADIUS factors to check for a group membership before deciding to perform RADIUS authentication or allow the user to login with just secure LDAP.
This might be handy if you are not doing the big bang approach to enabling Azure MFA across the board while still needing to authenticate users via Citrix ADC and Azure MFA with NPS extensions (i.e no Azure AD SAML).
The below assumes you have setup the NPS servers and have a Citrix Gateway virtual server already.
Note to replace the angular bracketed fields <replaceme> with your environment’s specifics.
The below code is for example and simplicity only. It is suggested in all instances that both LDAPS and RADIUS is load balanced by the ADC for resiliency, and as such you would be pointing back to the ADC for the appropriate LB values
First create secure LDAP authentication action and policy, noting that this action will also perform group extraction for the authenticated user hence we will specify the groupAttrName parameter in the LDAP action:
add authentication ldapAction ldaps_auth-AzureMFA -serverIP <IP address of Domain Controller> -serverPort 636 -ldapBase "DC=<domain,DC=com,DC=au>" -ldapBindDn <[email protected]> -ldapBindDnPassword <1234567890> -ldapLoginName sAMAccountName -groupAttrName memberOf -subAttributeName cn -secType SSL -nestedGroupExtraction ON -groupNameIdentifier sAMAccountName -groupSearchAttribute sAMAccountName
add authentication Policy ldaps-nfactor-auth-pol -rule True -action ldaps_auth-AzureMFA
Next create the RADIUS authentication action and policy:
add authentication radiusAction radius_AzureMFA2 -serverIP <IP Address of NPS Server> -serverPort 1812 -authTimeout <150> -radKey <1234567890> -radNASid MFA -passEncoding mschapv2
add authentication Policy radius-nfactor-auth-pol -rule TRUE -action radius_AzureMFA
Create login schemas that we will use later:
add authentication loginSchema passthrough -authenticationSchema noschema
add authentication loginSchema nFactor_AzureMFA_LoginSchema -authenticationSchema "/nsconfig/loginschema/LoginSchema/SingleAuth.xml"
Now create the RADIUS block for nFactor:
add authentication policylabel nFactor-RADIUS-AzureMFA-PolicyLabel -loginSchema passthrough
bind authentication policylabel nFactor-RADIUS-AzureMFA-PolicyLabel -policyName radius-nfactor-auth-pol -priority 100 -gotoPriorityExpression END
When ready, create decision block for nFactor and link it to the policy label for the RADIUS factor if the condition matches that the user is a member of Azure-MFA-Users. This is the main difference from the original solution and this particular variation:
add authentication Policy memberOf-Azure-MFA-Users -rule "AAA.USER.IS_MEMBER_OF(\"Azure-MFA-Users\")" -action NO_AUTHN
add authentication Policy not-memberOf-Azure-MFA-Users -rule "AAA.USER.IS_MEMBER_OF(\"Azure-MFA-Users\").NOT" -action NO_AUTHN
add authentication policylabel nFactor-GroupCheck-PolicyLabel -loginSchema passthrough
bind authentication policylabel nFactor-GroupCheck-PolicyLabel -policyName memberOf-Azure-MFA-Users -priority 100 -gotoPriorityExpression NEXT -nextFactor nFactor-RADIUS-AzureMFA-PolicyLabel
bind authentication policylabel nFactor-GroupCheck-PolicyLabel -policyName not-memberOf-Azure-MFA-Users -priority 110 -gotoPriorityExpression NEXT
Create authentication (AAA) virtual server which is non-addressable and bind the starting authentication policy and starting schema policy. Link it to the policy label nFactor-GroupCheck-Policy Label for the decision block:
add authentication vserver AuthVS-AzureMFA-NPS SSL 0.0.0.0
set ssl vserver AuthVS-AzureMFA-NPS -ssl3 DISABLED -tls1 DISABLED -tls11 DISABLED -dtls1 DISABLED
bind authentication vserver AuthVS-AzureMFA-NPS -portaltheme RfWebUI
bind authentication vserver AuthVS-AzureMFA-NPS -policy ldaps-nfactor-auth-pol -priority 100 -nextFactor nFactor-GroupCheck-PolicyLabel -gotoPriorityExpression NEXT
bind authentication vserver AuthVS-AzureMFA-NPS -policy nFactor-AzureMFA-Schema-Pol -priority 100 -gotoPriorityExpression END
bind ssl vserver AuthVS-AzureMFA-NPS -cipherName DEFAULT
bind ssl vserver AuthVS-AzureMFA-NPS -certkeyName <cert key name>
bind ssl vserver AuthVS-AzureMFA-NPS -eccCurveName P_256
bind ssl vserver AuthVS-AzureMFA-NPS -eccCurveName P_384
bind ssl vserver AuthVS-AzureMFA-NPS -eccCurveName P_224
bind ssl vserver AuthVS-AzureMFA-NPS -eccCurveName P_521
Create the authentication profile which we will use to configure the Citrix Gateway:
add authentication authnProfile Auth-Profile-nFactor-AzureMFA -authnVsName AuthVS-AzureMFA-NPS
Finally, bind the authentication profile with the Citrix Gateway when you are ready and test. You can handle this via normal CLI or the GUI as you see fit
Hopefully, you will find these command blocks below with explanations useful in your travels. Enjoy – Wee Sern Soo